Hello my name is ashish(ash) welcome to arduino as an usbasp programmer toutorial
1.get ur arduino and avr chip to be programmed ready
2.connect arduino as u always do (install ftdi driver,specify the comport,etc)

3.just like u select the com port number for arduino in the arduino software select it in the arduino hex uploader software
4.now select the type of atmega u have connected, m168 if decimela that is atmega168,m328 if uno that is atmega328,and m8 if arduino ng that is atmega8 (hope u understand u will have to select the chip which is on the arduino board )
5.now select the "arduino as usbasp atmega*.hex" file (select the file as same as the microcontroller u have if u have atmega8 select arduino as usbasp atmega8.hex if u have atmega168 select arduino as usbasp atmega168.hex if u have atmega328 on board select arduino as usbasp atmega328.hex )
6.now press upload button in the software and let the hex upload on the board ,(for those who dont have the auto rest feature on arduino u will have to press the reset switch as soon as u see the command prompt window)
7.now connect as shown in the picture,and connecet the usb to the computer(disconect the arduino usb cable before connecting the arduino as usbasp circuit usb)
download firmware and scheamtic here in download area
alternative download area
this picture is in the download area plz downlaod to see clearly

for those whose arduino usbasp is yet uncessfull after thousand tries should follow the complete v-usb schematic which uses some zener diod and resistors, do it, the procedure is as simple as the old one only adding few more components ,even i was unaware of it that the minimum circuit might not work on other pc till i got a desktop,all i could say is that what workd on my old laptop didnt work for my desktop then i thought of to do it once again with the complete circuit and then i found it to be working on my desktop too

A rough demonstration
###################################################################################
After u have succesfully made ur usbasp device it will be detected as soon as u connect it to the usb port
once u see usbasp detected now its time to install drivers(if u get device not recognised then u check that u have uploaded firmware correctly or check the usb hardware setup is done correctly and if nothing shows up then check that u have connected the 2.2k resistor between the vcc and D+ )
I asume now a days people mostly use windows 7 so this toutorial will deal in to install drivers on
Windows 7 and for Linux and MacOS no kernel driver is needed
Installing drivers :
Various methods have been suggested including a utility called Driver Signature Enforcement Overrider or Pressing F8 at boot time and selecting Disable Driver Signature Enforcement. These approaches were far from ideal.
With the release of libusb-win32 version 1.2.4.0 this is a thing of the past. A new USBASP driver is now available; is based on the libusb-win32 driver; and supports 32 and 64 bit windows. It is partially signed which means windows still produces a warning during installation, but that warning does not prevent installation of the driver.
OK, now for the installation procedure…
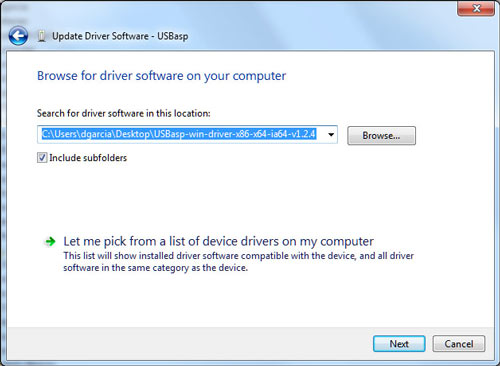
1. Download the driver from http://www.protostack.com/download/USBasp-win-driver-x86-x64-ia64-v1.2.4.zip and unzip it
2. For those having issues with the zip file, please try the following rar file http://www.protostack.com/download/USBasp-win-driver-x86-x64-ia64-v1.2.4.rar
3. Insert the USBASP into your USB port
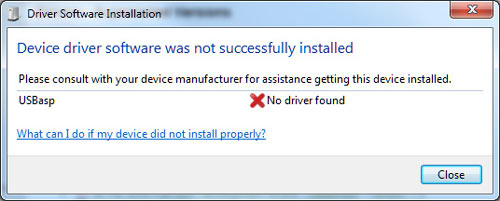
4. The system will attempt to install a driver from Windows Update
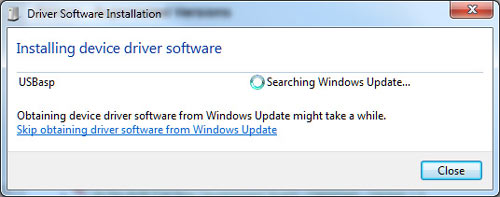
5. and will fail
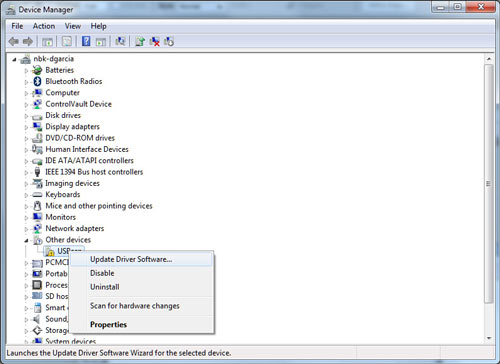
6. At this point, go into device manager and find the entry for the USBASP programmer. It should be displayed with a yellow alert icon next to it.
7. Right click on the device and select “Update Driver Software”
8. When prompted “How do you want to search for driver software”, select “Browse my computer for driver software”
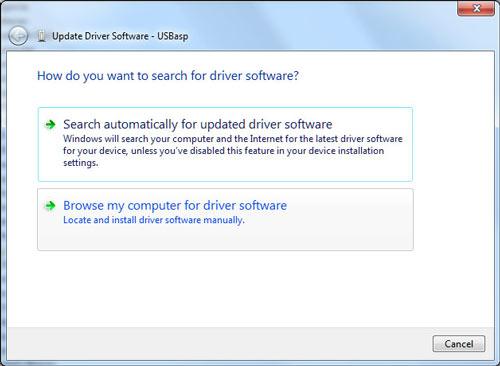
9. Select the folder where you unzipped the driver files then click “Next”
7. Right click on the device and select “Update Driver Software”
8. When prompted “How do you want to search for driver software”, select “Browse my computer for driver software”
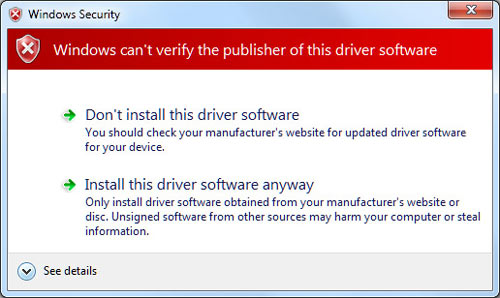
11. Click “Install this driver software anyway” and the driver will install.
###################################################################################
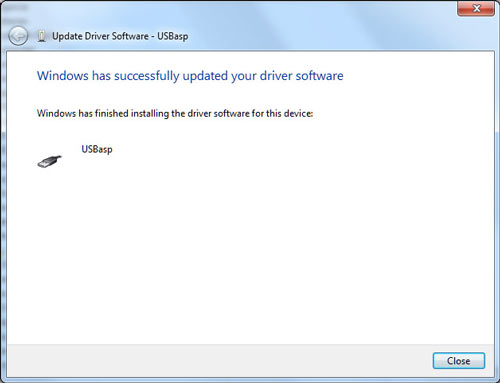
Now u have successfully installed the drivers for usbasp
Its time to use now , you can use the usbasp with this software below:
Extreme burner-AVR
AVR8 Burn-O-Mat: a GUI for avrdude
Khazama AVR Programmer
Sinaprog
avrdude
And you can also use usbasp with arduino
happy programming :)
Im on facebook
written by ashish sharma
credit vikash patil for arduino hex uploader
credit thomas fischl for usbasp programmer
refrence :
Hello,
ReplyDeleteIs there any chance to use this with a mega2560 ?
Thank's very much, it's help my project...
ReplyDeleteyoutube - videodl.cc
ReplyDeleteYouTube - youtube.com/videos-video-streaming youtube - youtube.com/videos-video-streaming youtube - videos - YouTube Videos Watch Watch, Vimeo Stream, youtube mp3 Google Accounts, Twitch Streams. youtube.com.
CASINO DATES OFF 30th August 2021 - JetXtra
ReplyDeleteCASINO DATES OFF 30th August 고양 출장샵 2021. BET NOW. 4.15. $0.20 서울특별 출장안마 $0.20. BET NOW. $0.20 $0.20. BET NOW. $0.20. BET 오산 출장마사지 NOW. $0.20. BET NOW. 나주 출장샵 $0.20. BET NOW. 세종특별자치 출장마사지